
How to Install LED Light Strips Cleanly: 2026 Guide turns lighting specifications into practical decisions about brightness, color quality, controls, installation and ecosystem compatibility. The goal is reliable lighting that fits the room and the way you actually use it.
Quick Verdict
- Best for: readers building practical mood, task or accent lighting without unnecessary complexity.
- Focus on: brightness, white-temperature range, color quality, controls, ecosystem support and installation quality.
- Watch for: weak adhesives, poor power supplies and incompatible controllers cause more frustration than extra lighting effects solve.

Table of contents
Introduction
LED strip lights have transformed how homeowners and renters illuminate rooms, entertainment setups and even cars. Their slim profile and energy efficiency make them ideal for accent lighting under cabinets, behind TVs, along stairways, or around gaming desks. According to the U.S. Department of Energy, LED lamps use at least 75 % less energy and last up to 25 times longer than incandescent bulbsenergy.gov. This efficiency has accelerated adoption; by 2019 LEDs accounted for nearly half of global lighting sales and may reach 87 % of installations by 2030ledlightingsupply.com. But while LED strips are versatile, improper installation can lead to peeling, sagging or corners that look unprofessional.
This guide explains how to install LED strip lights like a pro—even if it’s your first DIY lighting project. We’ll cover pre‑installation planning, surface preparation, cutting and connecting strips, securing them for the long term and navigating corners. Along the way, you’ll learn from industry experts and real‑world case studies to avoid common pitfalls. The article also includes links to FrediTech’s guides on smart lighting and LED strip selections, for deeper dives on smart home gadgets
Understanding LED Strip Lights
Before jumping into installation, it’s essential to understand what LED strip lights are and why they’re popular. LED strips consist of flexible printed circuit boards with surface‑mounted light‑emitting diodes (LEDs) spaced evenly along the length. They’re typically sold by the meter and have adhesive backing for easy mounting.
Energy efficiency and longevity
LED technology is far more efficient than incandescent or fluorescent lighting. The U.S. DOE notes that LEDs reduce energy use by 75 % or more and can last 15,000 to 50,000 hours. Modern LED strips can convert up to 80 % of electrical energy into light, and premium strips operate for decades when properly cooledflexfireleds.com. This longevity makes them ideal for hard‑to‑reach spaces such as coves or behind cabinets where frequent bulb changes are impractical.
Versatile applications
LED strips come in various densities (30–120 LEDs per meter), voltages (5 V, 12 V or 24 V) and protection ratings (IP20 for indoor use, IP65 for outdoor or humid environments). They offer solid colors, tunable white, RGB or RGBW color‑changing options and can be controlled with remotes, phone apps or voice assistants. FrediTech’s “Best LED Light Strips for TV Backlight, Bedroom & Gaming Setup” highlights how different strips enhance ambience in bedrooms, entertainment centers and gaming setups, with options such as dynamic RGBIC effects and music synchronization.
Safety and comfort
Properly installed LED strips not only beautify spaces but also reduce eye strain. Bias lighting behind monitors provides ambient light so pupils don’t over‑dilate, leading to richer contrast and less fatigue. When used in bedrooms, warm tones (2,700–3,000 K) promote relaxation and sleep, while daylight tones (6,000–6,500 K) energize workspaceseurekaergonomic.com. FrediTech’s guide on smart bulbs and mood lighting explores how color temperature influences mood and productivity, underscoring the value of choosing the right strip.
Pre‑Installation Planning
Careful planning determines how smoothly your LED strip project will go. Don’t rush—measure, assess and gather materials before peeling the adhesive.
Evaluate your space and surface
- Identify mounting locations. Decide whether you’re installing under cabinets, behind a television, along stairs or around a gaming desk. For under‑cabinet lighting, Armacost Lighting recommends positioning strips one to two inches back from the cabinet front for maximum countertop illumination. Reflective countertops benefit from mounting strips on the inside lip pointing toward the backsplash to reduce glarearmacostlighting.com.
- Assess corners and curves. Determine whether your installation requires sharp turns. Standard flexible strips can handle gentle vertical bends but are not designed for horizontal folds or 90° angles. According to Benwei, bending strips too sharply can fracture copper traces, causing dead sections or flickeringbenweilight.com/. Plan to use connectors or soft curves instead.
Choose the right LED strip and power supply
- Strip type. Select density (LEDs per meter) based on brightness requirements. Low‑density strips (30 LEDs/m) are ideal for accent lighting, while high‑density strips (60–120 LEDs/m) deliver continuous light. Consider waterproof (IP65) strips for bathrooms or patios.
- Voltage and run length. Most strips operate at 12 V or 24 V. Longer runs require higher voltage to reduce voltage drop. Check manufacturer specifications for maximum run length and cut points—standard strips can only be cut at designated copper padsaspectled.com.
- Control method. Decide whether you’ll use a simple switch, dimmer, remote or smart‑home system. If you plan on integrating with voice assistants (e.g., Amazon Alexa or Google Home), choose strips and controllers that support the desired platform.
Gather tools and accessories
- LED strip lights (cut to length).
- Power supply with matching voltage and wattage.
- Controller/dimmer if desired.
- Solderless connectors (L‑shape or straight, depending on corners).
- Measuring tape and pencil.
- Sharp scissors or utility knife (only cut on designated pads).
- Isopropyl alcohol and lint‑free cloths.
- Optional: fine‑grit sandpaper (150–300 grit) for rough surfaces.
- Optional: mounting channels or aluminum profiles for a polished look and heat dissipation.
- Optional: double‑sided tape, mounting clips or silicone adhesive for added support.
Preparing Surfaces to Prevent Peeling
Successful LED installations begin with thorough surface preparation. Adhesives fail when surfaces are dirty, oily or porous, leading to strips peeling off after a few hours or days.
Clean and dry surfaces
- Degrease with isopropyl alcohol. Both Mardom Decor and Armacost Lighting stress cleaning mounting surfaces with isopropyl alcohol. Mardom notes that degreasing ensures the adhesive properly bonds to the substratemardomdecor.com, while Armacost warns against using household cleaners because they leave residues that hinder adhesion.
- Ensure surfaces are dry and warm. Adhesive tape works best above 15 °C (60 °F). If working in a cool garage or basement, run a space heater or hairdryer to warm the surface before installation. Also ensure fresh paint has fully cured according to manufacturer guidelines.
Enhance adhesion for tricky surfaces
Even with good preparation, certain surfaces (e.g., textured walls, wood, rough plastic) may cause tape failure. Consider these solutions:
- Hot glue or epoxy. For surfaces like concrete or rough wood, apply a small bead of hot glue or clear epoxy before pressing the strip in place. Epoxy provides a permanent bond, so use sparingly if you may need to remove the strip later.
- Magnetic strips. On metal surfaces, magnetic strips or magnetic fixtures offer a non‑adhesive solution, allowing you to remove or reposition the strips easily.
Test positioning before committing
Measuring and Cutting LED Strips
LED strips are designed to be cut to custom lengths, but cutting incorrectly can damage them. Follow these steps to ensure clean cuts and proper operation.
Identify cut lines
Cutting procedure
- Disconnect power. Never cut a strip while it’s connected to a power source.
- Measure twice, cut once. Measure the area and mark where the strip will end. Consider leaving extra length at corners for connectors.
- Cut precisely. Use sharp scissors or a utility knife to cut straight across the designated pads. Avoid using dull blades that can tear the strip.
- Prepare for connectors. If you plan to attach a solderless connector, Flexfire notes that some strip types require extra copper pad area. When installing connectors on high‑density strips, cut both solder pads to provide enough space for the connector headflexfireleds.com.
Installing LED Strips Without Peeling
With surfaces prepared and strips cut to size, it’s time to install. A careful approach will ensure the tape bonds well and stays put for years.
Step‑by‑step installation
- Layout and mock install. Place the strips along your marked path without removing the backing. Connect them to the power supply temporarily and check for uniform brightness. Adjust position as needed.
- Use additional adhesives if needed. For long runs or heavy strips (e.g., COB or neopixel), apply a small amount of mounting glue, hot glue or silicone at intervals to reinforce the bond. Avoid excessive glue that seeps beyond edges.
- Test and enjoy. Once the strip is fully pressed and connected, power it on and check for consistent illumination. If sections don’t light, verify connections and polarity. Allow adhesives to cure for 24 hours before adding stress (e.g., cleaning or repositioning).
Real‑world example: TV backlight installation
Many homeowners install LED strips behind TVs to create bias lighting that reduces eye strain. Our FrediTech guide on choosing LED strips for TVs and gaming recommends selecting RGB or tunable‑white strips with remote control for flexibility. The installation involves measuring the TV perimeter, cutting the strip at appropriate pads, cleaning the TV’s back with alcohol, sticking the strip around the edges (leaving a small gap at corners for connectors) and connecting to a USB power source. According to Lepro’s step‑by‑step installation instructions, unroll the strip, clean the surface, measure and stick the strip, then connect the power supplylepro.com. Bias lighting behind TVs helps maintain mid‑range pupil size and reduces eye strain.
Navigating Corners and Achieving Clean Lines
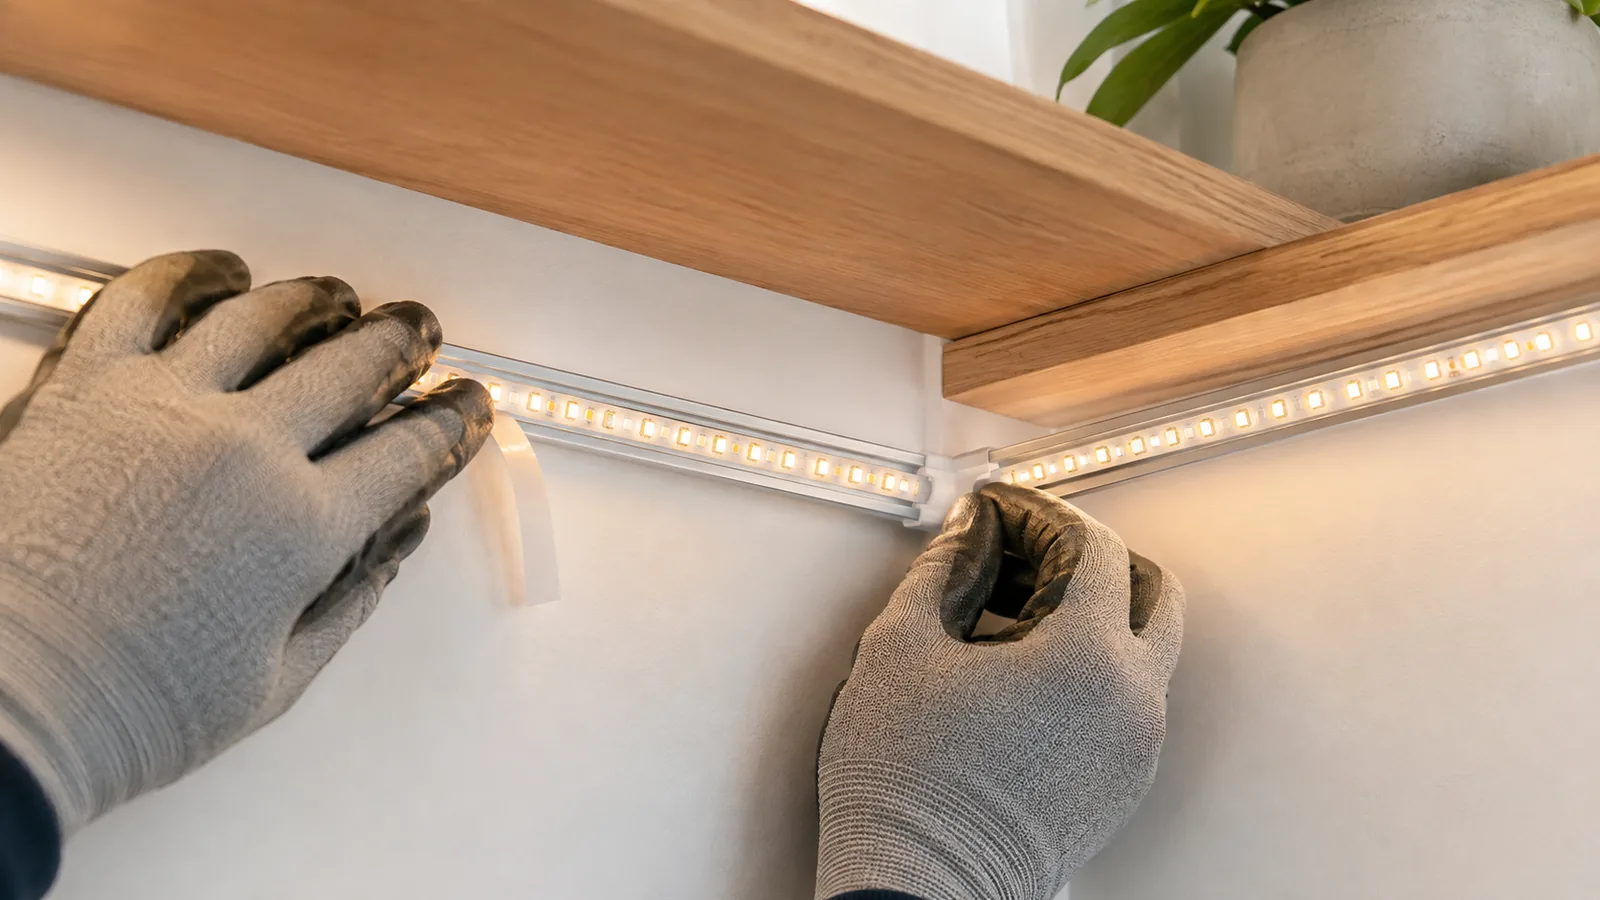
Corners can make or break the aesthetics of your installation. Folding the strip at 90° not only looks messy but also risks damage. To achieve crisp turns without compromising the strip’s circuitry, follow these guidelines.
Understand bending limitations
Use connectors for 90° turns
- Cut at the mark. Use scissors to cut exactly on the copper pad.
- Insert into the connector. Open the connector’s cap, align the copper pads with the metal hooks and insert the strip. For IP20 indoor connectors, ensure the strip faces up toward the clear lid. For IP65 outdoor connectors, fill the silicone sleeve with sealant before inserting the strip.
- Close with pliers. Use pliers to press the cap until you hear a click, ensuring the hooks pierce the solder pads.
- Repeat for the other side. For jumper connectors or when linking two strips, repeat the process on both ends.
- Test. Connect the strip to the power supply and ensure the corner lights up evenly.
Create soft curves and loops
Use channels and profiles for corners
Choosing and Installing the Right Power Supply and Controllers
Reliable power and control are just as important as secure mounting. Here’s how to select and install them.
Power supply selection and installation
- Calculate wattage. Multiply the wattage per meter (listed on the strip’s packaging) by the length of your run. Add 20 % overhead to ensure the power supply isn’t constantly at maximum load. For example, a 12 W/m strip running six meters uses 72 W; adding 20 % means selecting at least an 86 W power supplywired4signsusa.com.
- Match voltage. Use a 12 V power supply for 12 V strips and 24 V for 24 V strips. Using the wrong voltage can damage the LEDs.
- Consider plug‑in vs. hardwired supplies. Plug‑in adapters are convenient for small projects, while hardwired supplies (installed behind cabinets or in walls) offer a cleaner look and support longer runs.
- Install safely. If hardwiring, turn off power at the breaker and follow local electrical codes. Use proper wire gauge and connectors. For plug‑in supplies, route cables neatly and secure them with clips to prevent sagging.
Controller and dimmer options
Controllers allow you to adjust brightness, color and effects. Basic options include:
- In‑line dimmers: Simple knobs or buttons that control brightness for single‑color strips.
- RGB/RGBW controllers: Handheld remotes or Wi‑Fi–enabled controllers that change colors and scenes. Look for models compatible with your voice assistant if you want smart control.
- Tunable‑white controllers: Adjust color temperature (warm to cool) for circadian lighting.
- Smart plugs and switches: FrediTech’s article on smart bulbs vs. smart switches highlights that smart switches can reduce energy consumption by up to 30 % through scheduling. Smart plugs also eliminate standby power drawfreditech.com/ and can be used to automate LED strips.
Install controllers between the power supply and the LED strip. Follow manufacturer instructions for wiring order and polarity. Many controllers include adhesive backing or mounting holes for secure placement.
Securing Your Installation for the Long Term
LED strips can last decades, but only if installed with proper support and environmental protection.
Use mounting glue and profiles
Protect LED strip ends
Store power supplies and controllers properly
Troubleshooting Common Problems
Even with careful preparation, issues may arise. Here’s how to address them.
Strips not sticking
- Check surface cleanliness. Dirt and oil are the main reasons adhesives fail. Clean again with isopropyl alcohol.
- Apply additional adhesive. Use double‑sided tape, hot glue or specialized LED adhesive as ZBL Lighting suggests.
- Use clips or channels. Mounting clips provide mechanical support and are useful on textured surfaces.
- Control environment. Extreme temperatures or humidity can affect adhesion, so maintain moderate conditions.
Flickering or dead sections
- Check polarity and connections. Ensure positive and negative terminals are properly aligned. Flexfire stresses that mismatched polarity prevents strips from lighting.
- Inspect cut points. Cutting outside designated pads can break the circuit.
- Avoid over‑bending. Dead spots often result from copper fractures caused by sharp bends. Use connectors instead.
- Verify power supply capacity. If the supply is undersized, voltage drop can cause dimming or flickering. Add a stronger supply or shorten the run.
Uneven brightness or color
- Ensure uniform voltage. Longer runs may experience voltage drop toward the end. Use higher‑voltage strips (24 V) or inject power at multiple points.
- Match LED types. Different batches or types of strips can have varying color temperatures. Flexfire recommends verifying color and type before installation.
Conclusion
Installing LED strip lights like a professional isn’t difficult—it just requires attention to detail. Start by planning your layout, selecting the right strip and power supply, and preparing surfaces meticulously. Clean, dry, degreased surfaces and proper pressure on 3M tape prevent peeling. Cut only at designated copper pads, test your layout before sticking, and use connectors for sharp turns to protect internal circuits. Reinforce your installation with mounting glue, clips or channels for a polished look and long‑lasting adhesion. With these techniques—and some patience—you can enjoy vibrant, energy‑efficient lighting that enhances every space.
FAQ – Answers to Common Questions
What do I do if my LED strip lights won’t stick?
Clean the surface thoroughly with isopropyl alcohol and let it dry. If the built-in adhesive still fails, use high-quality double-sided tape, hot glue or specialized LED adhesive. Mounting clips or channels offer additional mechanical support.
Can I cut LED strip lights anywhere?
No. Only cut at designated copper pads or scissor icons. Cutting elsewhere can break the circuit and cause parts of the strip to stop working. Some continuous strips cannot be cut at all—always check the product manual.
How do I get around corners without damaging the strip?
Why do my LED strips flicker or display uneven brightness?
Flickering usually results from polarity errors, insufficient power supply, voltage drop on long runs or damaged circuits from sharp bends. Ensure positive and negative connections match, use a properly sized power supply with a 20% safety margin, and avoid bending the strip beyond its minimum bend radius.
Can I install LED strips outdoors?
Yes, if you choose waterproof (IP65 or IP68) strips and seal all connections. Use outdoor-rated power supplies and connectors. Benwei cautions that excessive bending can crack silicone coatings and allow moisture into the strip, so follow recommended bend radii and seal ends with silicone and end caps.
How long do LED strip lights last?
Quality LED strips can last 15,000 to 50,000 hours, translating to many years of use. Longevity depends on factors such as heat management, power supply quality and installation conditions. Using aluminum channels to dissipate heat and choosing a properly rated power supply will extend lifespan.
Are LED strip lights energy efficient?
Absolutely. LEDs use at least 75% less energy than incandescent bulbs and last up to 25 times longer. By 2030, LED technology may account for 87% of global lighting installations. Therefore, investing in LEDs not only reduces electricity bills but also minimizes replacement frequency.
Do I need a professional to install LED strips?
Most installations are DIY-friendly. By following this guide—cleaning surfaces, cutting at the right spots, using connectors for corners and selecting a suitable power supply—you can achieve professional-looking results. For complex installations involving hardwired power supplies or integration with home wiring, consult a licensed electrician.
How can I control my LED strips with my phone or voice assistant?
Choose LED strips with smart controllers or pair them with smart plugs/switches. FrediTech’s comparison of smart bulbs versus smart switches explains that smart switches allow scheduling and remote control, helping you automate lighting and save energy. Many LED kits support Wi-Fi, Bluetooth or Zigbee for integration with apps and voice assistants.
Author: Wiredu Fred – Wiredu Fred is a technology writer and smart‑home enthusiast with extensive experience reviewing and installing LED lighting solutions. As a Founder and great contributor to FrediTech, he focuses on energy efficiency, smart‑home integration and hands‑on guides that empower readers to tackle DIY projects confidently..
Bottom Line
Good smart lighting should improve the room first and impress with features second. Choose reliable hardware, sensible controls and an installation method that will stay secure and maintainable.